How to measure a level trought analog inputs and with LtouchGS

Our LtouchGS product is ideally suited for the industrial environment, where analog signals are to be acquired.
LtouchGS comes standard with two analog inputs, voltage or current, with a resolution of 17 bits.
In this article, we explain the main steps to create an application that detects a tank level and then triggers an alarm and sends it via email.

First we need to connect our level sensor with 0.20 mA analog output to our input, following this image.

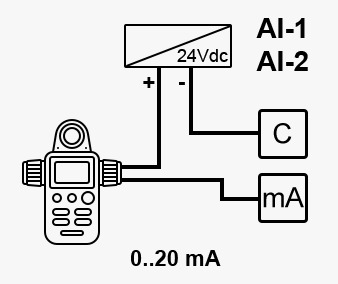
We must respect the polarity and so we connect the ground of power supply wire to the GND terminal of the Ltouch.
The output wire of sensor must be connected to the current mA terminal of the Ltouch.

Finally, the code for this setup is very simple. The following diagram measures the 0-20mA signals on channel 1, with a resolution of 17 bits, and maps the current over a level range. This mapping will depend on the transmitter, the example below maps from 0 mA to 0 cm and from 20 mA to 100 cm.

Now let’s move on to the code part for the APP:

You can use the library BMTouch to configure and read the values in to android studio.

View this for download library 

View this for how to use BMtouch Library

To configure the sampling frequency directly write the value of the frequency and scale through the library subito dopo protected void onCreate :

BMTouch.ADC_set_scale((byte) 0, (byte) 0, 1);

BMTouch.ADC_set_frequency((byte) 0, 15);

Now we can call the library function to read the analog value through a single call or by creating a TimerTask that executes this cyclically, you can see on this video how to do it.

ch1_val = BMTouch.ADC_read_channel((byte) 0, (byte)0);

ich1_val returns the value read from 0 to 32768, it is up to us to know that 32768 is hight 100 cm, so we can make a portion and find the quantity of the tank.

To send an email at a minimum or maximum threshold, we can watch this video that explains in detail how to send an email through gmail.

that’s all, if you have any doubts or requests, contact us by email.

How to use Relay on Ltouch43

In our Ltouch43 Android HMI  there are 4 Relays and all the relays are in exchange contact. They have 24Vdc coil and max 5A contact current. All RELAY outputs are high quality relay and protected by varistors, all connectors are removable.

BMTouchGP12 – Relay R2

BMTouchGP13 – Relay R4

BMTouchGP14 – Relay R1

BMTouchGP15 – Relay R3

Before using them we must in the onCreate method :

instantiate the library BMtouch::

  • tmp = BMTouch.LIBsetup(BMTouch.EN12 + BMTouch.EN13 + BMTouch.EN14 + BMTouch.EN15);

Set PIN (GP–) as output, sets the pin (pin) indicated as output and sets its logical level as value::

    • val[0]= 0;
    • BMTouch.GPIOSetupOut(BMTouch.GP12, val[0]);
    • BMTouch.GPIOSetupOut(BMTouch.GP13, val[0]);
    • BMTouch.GPIOSetupOut(BMTouch.GP14, val[0]);
    • BMTouch.GPIOSetupOut(BMTouch.GP15, val[0]);

To switch the output by activating it or not, use this command::

    • tmp=BMTouch.GPIOWrite(BMTouch.GP13, val[0]);

where val [0] corresponds to:

  • 0 relay OFF
  • 1 relay ON

ADB and micro USB for data communication

ADB stands for “Android Debug Bridge” and it basically just allows you to send commands to your device Ltouch.

Download SDK Platform Tools ADB is a small tool bundled in the Android SDK as part of the “Platform Tools.”

ADB stands for “Android Debug Bridge” and it basically just allows you to send commands to your device.

Users used to be required to download the entire SDK (which is very large) just to use ADB, but Google now allows users to download only the Platform Tools.

  • Download the SDK Platform Tools for Windows, Mac, or Linux from https://developer.android.com/studio/releases/platform-tools.html
  • Extract the ZIP file somewhere easily accessible (like C:\platform-tools) We’ve got ADB downloaded on your computer and your Android device is ready to receive instructions.
  • Now it’s time to put it all together and run your first ADB command.
  • Connect your Ltouch to the computer with a USB cable
  • The USB mode must be PTP in order for ADB to work. You can usually change this from the notification shade
  • Make sure to allow USB debugging if a pop-up appears
  • Open the platform-tools folder on your computer
  • Shift+Right Click and select Open command prompt here
  • Type adb devices and hit Enter

That’s all, good work

New Ltouch7 Plus

Coming soon a new black HMI touch screen panel with Android operating system with inputs and outputs on board.
16 digital inputs / outputs, 4 configurable analog inputs with 16bit resolution, 4 analog outputs 0..10V / 4..20mA.
Display HD 7 “capacitive resolution 1028×800 IP56.

Quad core A9 dinamyc frequency scaling from 400 to 1.4G Hz.

A new native library dedicated to manage the inputs and outputs.

Android App and Modbus RTU

We made a small and simple application for our well Ltouch panels to allow users to configure and subsequently communicate with all Modbus RTU devices.

Biemme Config, will be installed as standard on all our touch, so make it easier to configure the Modbus RTU devices.

In a few simple steps we can write and read using the Modbus RTU functions 03 and 16.

We prepare communication; We connect via a three-wire cable on Modbus device and Ltouch.

The Modbus RS485 port is positioned in the side of a connector DB9 and uses these pins:

  • 2 – A
  • 3 – B
  • 5 – GND

Set the speed of communications (thanks to our Libreria the app supports speeds up to 115200) and the timeout.

The Function 03:

Node Id: corresponds to the slave to read.

Start Register : corresponds to the first register for the Modbus read

Number Registers: Corresponds how many registers I want to read

Once configured these three fields we can, using the three buttons, perform the read request.

Single reading: Ltouch will perform a read-only and represents the values read on the screen.

Continuous cycle reading: Ltouch will perform the readings at intervals of a second in a cyclic mode. The values will be shown on screen.

FUNCTION 16:

With this feature we can write the integer values:

Node ID: It corresponds to the address of the slave in which I am going to write

Start Register: It is the first register in which I am going to write

Number Registers: It represents the number of consecutive registers in which I will write the value.

Value: It represents the value that will write.

To close the application just press over the Biemme logo

BieMme Italia at Maker Faire Trieste 2014

maker faire trieste logo bminiWe are happy to announce that BieMme Italia has been accepted to be part of the Mini Maker Faire Trieste exhibitors. The Maker Faire will held on May 17th from 10am to 18pm at the International Centre for Theoretical Physics, Miramare, Trieste, Italy.

The Faire will be a great occasion to show you all our products in production such as the BMini shield, the Bmini all-in-one and the new analog converter just to name a few. During the faire, there will be workshops and panels that will help you to understand how to use the Bmini and whether they meet your projects’ requirements.

We are really proud to share with you our thought, passion and competences. So, please stop by at our stand. We look forward to meet you! See you there!

Latest News: Website and On Line Store

Android logoWe are happy to announce that BieMme Italia web site’s new sections are now live. The main front page has been redesigned reflecting the new products’ categories we offer, namely:

Every section listed above describes the details of the products with pictures, videos and technical specifications. Just check it out and let us know what do you think!

European Vat ExemptionThe second news is about the on line store. Starting from January 2014, all the orders from European companies placed in the on line store can benefit from Vat exemption, as long as the company is registered in the European VIES list. Just add your Vat number during the sign in process or specify it under MyAccount/View or change my account information once logged in.

Happy Easter 2013

Easter egg redHappy Easter from all the Biemme Italia staff!

We would like to thank you all the people that every day wrote us and that are following your innovative projects. We are working hard on developing new products for smart home and industrial automation. We are confident that they will surprise you! Stay tuned!