How to use Relay on Ltouch43

In our Ltouch43 Android HMI  there are 4 Relays and all the relays are in exchange contact. They have 24Vdc coil and max 5A contact current. All RELAY outputs are high quality relay and protected by varistors, all connectors are removable.

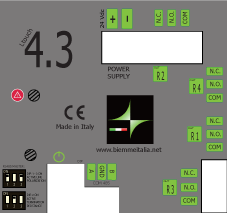
BMTouchGP12 – Relay R2

BMTouchGP13 – Relay R4

BMTouchGP14 – Relay R1

BMTouchGP15 – Relay R3

Before using them we must in the onCreate method :

instantiate the library BMtouch::

  • tmp = BMTouch.LIBsetup(BMTouch.EN12 + BMTouch.EN13 + BMTouch.EN14 + BMTouch.EN15);

Set PIN (GP–) as output, sets the pin (pin) indicated as output and sets its logical level as value::

    • val[0]= 0;
    • BMTouch.GPIOSetupOut(BMTouch.GP12, val[0]);
    • BMTouch.GPIOSetupOut(BMTouch.GP13, val[0]);
    • BMTouch.GPIOSetupOut(BMTouch.GP14, val[0]);
    • BMTouch.GPIOSetupOut(BMTouch.GP15, val[0]);

To switch the output by activating it or not, use this command::

    • tmp=BMTouch.GPIOWrite(BMTouch.GP13, val[0]);

where val [0] corresponds to:

  • 0 relay OFF
  • 1 relay ON

New Ltouch7 Plus

Coming soon a new black HMI touch screen panel with Android operating system with inputs and outputs on board.
16 digital inputs / outputs, 4 configurable analog inputs with 16bit resolution, 4 analog outputs 0..10V / 4..20mA.
Display HD 7 “capacitive resolution 1028×800 IP56.

Quad core A9 dinamyc frequency scaling from 400 to 1.4G Hz.

A new native library dedicated to manage the inputs and outputs.

Industrial Automation with Android: Acquisition of 6 PT100 Probes

The project I’m working on is about making an industrial automation system using an ARM Cortex A8 1Ghz Android-based touch HMI and a slave bm6PTI expansion module that communicates using RS485 and Modbus.

From the Android touch screen is possible to directly read 6 class B PT100 Temperature probes through an expansion module using RS485 and Modbus protocol at a speed of 19200 bps.

If required, it is possible to extend the project by adding other expansions modules up to a total of 63 bm6PTI therefore 378 temperature probes can be read.

Continue reading

0-10V, NTC/PTC and 4-20ma Arduino Analog Inputs Converter: the bmANA

The bmANA is an essential product when reading from analog inputs with Arduino.

4-20ma arduino analog input converter bmana

0-10V, NTC/PTC and 4-20ma Arduino Analog Inputs Converter

We are glad to present a simple but very powerful and flexible board that let you read different types of analog inputs. Now ready from our online store.

It is well known that in the home and (especially) in the industrial automation world the most used analog input types are 0-20ma/4-20ma (current), 0-10V (tension) or NTC/PTC thermocouples. Conversely, makers already know that the Arduino boards support 0-5V tension analog inputs only.

Based on these assumptions, we designed and created a new board that converts analog signals to 0-5V tension with 10-bit resolution. This will enhance spectrum of projects in which Arduino can be used.

The BmAna board has 4 analog inputs and each one can be set with one of the following measurement type:

  • 0-20ma (current)
  • 0-10V (tension)
  • PTC (thermocouples)
  • NTC (thermocouples)

Power supply: can be used either 5Vdc or 24Vdc for the most widespread use in every field of application.

To make easy and secure the connections with the measurement sources, we used terminal blocks.

Where and how can be used? This 0-10V, NTC/PTC and 4-20ma Arduino conversion board can be used for instance with our Bmini! Take for instance a flat cable with a RJ45 connector: plug it to the Bmini (through the J8 connector) and connect it to the bmAna. You have now expanded the functionalities of the Bmini and ready for reading almost all types of analog inputs currently used in the home and industrial automation sector.

Do you like this product? Just let us know!

In the following posts, we will present in more details the board features providing examples and technical specs.

Stay tuned!

Android Industrial: AC Drive over rs485

The following video represents an example of HMI in Industrial applications. In particular, in this project I used an Android multi touch that runs on Cortex A8 at 1Ghz and show how it can greatly control an AC drive. Specifically, I used a Allen-Bradley adjustable frequency AC drive.

The Android UI on the touch screen device allows to:

  • Start/Stop the motor
  • Set the direction (forward, backward)
  • Manage the output relay
  • Control the status of the digital inputs
  • See the parameters such as the current, frequency and output voltage
  • Set the motor frequency

You’ll find the source code and complete specifications of the project on my github channel. Don’t miss to check it out also our wiki section! As usual, comments are welcome 🙂